Timeline events
{{< history >}}
-
Introduced in GitLab 15.2 with a flag named
incident_timeline. Enabled by default. - Enabled on GitLab.com in GitLab 15.3.
-
Generally available in GitLab 15.5. Feature flag
incident_timelineremoved.
{{< /history >}}
Incident timelines are an important part of record keeping for incidents. Timelines can show executives and external viewers what happened during an incident, and which steps were taken for it to be resolved.
View the timeline
Incident timeline events are listed in ascending order of the date and time. They are grouped with dates and are listed in ascending order of the time when they occurred:
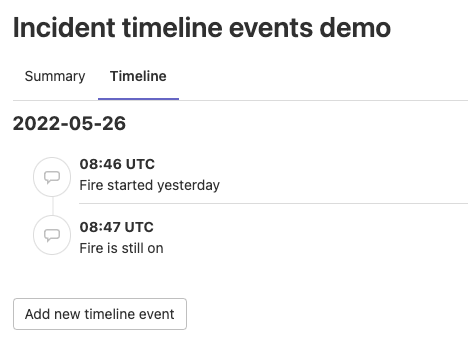
To view the event timeline of an incident:
- On the left sidebar, select Search or go to and find your project.
- Select Monitor > Incidents.
- Select an incident.
- Select the Timeline tab.
Create an event
You can create a timeline event in many ways in GitLab.
Using the form
Create a timeline event manually using the form.
Prerequisites:
- You must have at least the Developer role for the project.
To create a timeline event:
- On the left sidebar, select Search or go to and find your project.
- Select Monitor > Incidents.
- Select an incident.
- Select the Timeline tab.
- Select Add new timeline event.
- Complete the required fields.
- Select Save or Save and add another event.
Using a quick action
{{< history >}}
- Introduced in GitLab 15.4.
{{< /history >}}
You can create a timeline event using the /timeline quick action.
From a comment on the incident
{{< history >}}
- Introduced in GitLab 15.4.
{{< /history >}}
Prerequisites:
- You must have at least the Developer role for the project.
{{< alert type=”warning” >}}
Internal notes added to incident timelines in public and internal incidents are visible to anyone with access to the incident.
{{< /alert >}}
To create a timeline event from a comment on the incident:
- On the left sidebar, select Search or go to and find your project.
- Select Monitor > Incidents.
- Select an incident.
- Create a comment or choose an existing comment.
- On the comment you want to add, select Add comment to incident timeline ({{< icon name=”clock” >}}).
The comment is shown on the incident timeline as a timeline event.
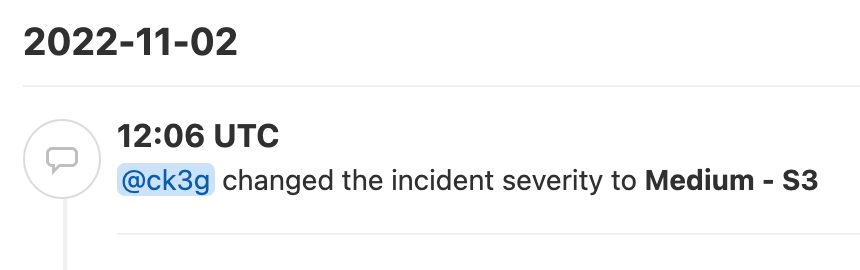
When incident severity changes
{{< history >}}
- Introduced in GitLab 15.6.
{{< /history >}}
A new timeline event is created when someone changes the severity of an incident.
When labels change
{{< details >}}
- Status: Experiment
{{< /details >}}
{{< history >}}
-
Introduced in GitLab 15.3 with a flag named
incident_timeline_events_from_labels. Disabled by default.
{{< /history >}}
{{< alert type=”flag” >}}
The availability of this feature is controlled by a feature flag. For more information, see the history. This feature is available for testing, but not ready for production use.
{{< /alert >}}
A new timeline event is created when someone adds or removes labels on an incident.
Delete an event
{{< history >}}
- Ability to delete an event when editing it introduced in GitLab 15.7.
{{< /history >}}
You can also delete timeline events.
Prerequisites:
- You must have at least the Developer role for the project.
To delete a timeline event:
- On the left sidebar, select Search or go to and find your project.
- Select Monitor > Incidents.
- Select an incident.
- Select the Timeline tab.
- On the right of a timeline event, select More actions ({{< icon name=”ellipsis_v” >}}) and then select Delete.
- To confirm, select Delete Event.
Alternatively:
- On the right of a timeline event, select More actions ({{< icon name=”ellipsis_v” >}}) and then select Edit.
- Select Delete.
- To confirm, select Delete event.
Incident tags
{{< history >}}
-
Introduced in GitLab 15.9 with a flag named
incident_event_tags. Disabled by default. - Enabled on GitLab.com in GitLab 15.9.
- Enabled on GitLab Self-Managed in GitLab 15.10.
-
Generally available in GitLab 15.11. Feature flag
incident_event_tagsremoved.
{{< /history >}}
When creating an event using the form or editing it, you can specify incident tags to capture relevant incident timestamps. Timeline tags are optional. You can choose more than one tag per event. When you create a timeline event and select the tags, the event note is populated with a default message. This allows for a quick event creation. If a note has already been set, it isn’t changed. Added tags are displayed next to the timestamp.
Formatting rules
Incident timeline events support the following GitLab Flavored Markdown features.